Git
Git
概念
- 分布式版本控制系统
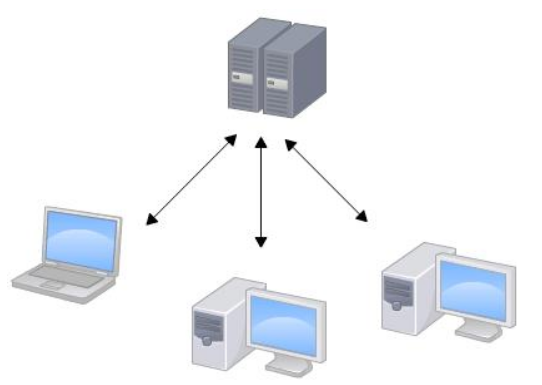
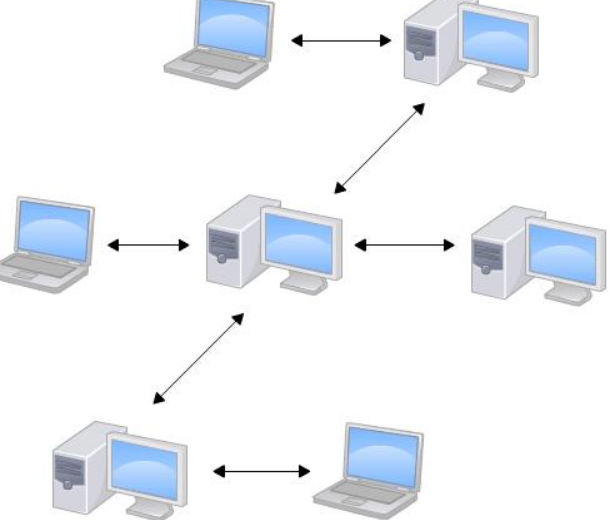
集中式与分布式的区别
集中式:使用中央服务器管理,使用者需从中央服务器拉取,编辑,再推送。缺点是网络局限性以及维护费用高。

分布式:通过中央服务器,”交换”本地服务器上的版本库的修改部分。
安装
Windows: 安装程序官网
按提示安装
打开Git Bash
输入命令-git config –global
1
2
$ git config --global user.name "Garden"
$ git config --global user.email "847686279@qq.com"
Linux:
输入命令-git(查看系统有没有安装git)
1
2
3
$ git
The program 'git' is currently not installed. You can install it by typing:
sudo apt-get install git输入命令-sudo apt-get install git-core
1
$ sudo apt-get install git-core
Mac OS X:
安装homebrew 官方文档
安装Xcode
从AppStore下载安装Xcode
运行Xcode
选择菜单“Xcode”->“Preferences”,在弹出窗口中找到“Downloads”,选择“Command Line Tools”,点击“Install”
创建版本库
输入命令-pwd(显示当前路径)
1
$ pwd
输入命令-cd(移至目标目录)
1
$ cd /d/Users/Administrator/MyGit
输入命令-git init(创建版本库)
1
$ git init
创建测试文本文件(win用户建议使用Notepad++)保存至git目录或其子目录
输入命令-git add filename(将此文件添加至版本库)
1
$ git add git_commit_test.txt
输入命令-git commit -m “提交信息”
1
$ git commit -m "git-test file commit"
修改文件
输入命令-git status(查看当前仓库状态)
1
2
3
4
-- 当前没有需要提交的修改
$ git status
On branch master
nothing to commit, working tree clean1
2
3
4
5
6
7
8
9
10-- 还没有准备提交的修改
$ git status
On branch master
Changes not staged for commit:
(use "git add <file>..." to update what will be committed)
(use "git checkout -- <file>..." to discard changes in working directory)
modified: git_commit_test.txt
no changes added to commit (use "git add" and/or "git commit -a")输入命令-git diff(查看修改部分)
1
2-- 没有修改部分
$ git diff1
2
3
4
5
6
7
8
9
10
11-- 有修改部分
$ git diff
diff --git a/git_commit_test.txt b/git_commit_test.txt
index eea97fe..42f8479 100644
--- a/git_commit_test.txt
+++ b/git_commit_test.txt
@@ -1 +1 @@
-# git commit test-1
\ No newline at end of file
+# git commit test
\ No newline at end of file输入命令-git add filename(将文件添加至仓库)
1
$ git add git_commit_test.txt
输入命令-git commit -m “提交信息”
1
2
3$ git commit -m "del -1"
[master 1bc39fe] del -1
1 file changed, 1 insertion(+), 1 deletion(-)输入命令-git status|diff(校验提交修改是否成功)
版本回退
输入命令-git log(查看提交历史)
1
2
3
4
5
6
7
8
9
10
11
12
13
14
15
16
17
18$ git log
commit 1bc39fe4d73abb1d9acecc733695d2f65c633f80 (HEAD -> master)
Author: Garden <847686279@qq.com>
Date: Mon Jan 22 17:31:05 2018 +0800
del -1
commit 7352e48e23933141d3961d4a49c3e22a9507f5a5
Author: Garden <847686279@qq.com>
Date: Mon Jan 22 14:44:38 2018 +0800
add -1
commit 07c6082b1fc9995b66b8243b106a31c80aa2e682
Author: Garden <847686279@qq.com>
Date: Sun Jan 21 20:19:32 2018 +0800
git-test file commit1
2
3
4$ git log --pretty=oneline
1bc39fe4d73abb1d9acecc733695d2f65c633f80 (HEAD -> master) del -1
7352e48e23933141d3961d4a49c3e22a9507f5a5 add -1
07c6082b1fc9995b66b8243b106a31c80aa2e682 git-test file commit输入命令-git reset –hard commit_id|HEAD^(回退版本)
1
2$ git reset --hard HEAD^
HEAD is now at 7352e48 add -11
2$ git reset --hard 1bc39fe
HEAD is now at 1bc39fe del -1输入命令-git reflog(查看命令历史记录,以便查找回退版本id)
1
2
3
4
5
6$ git reflog
1bc39fe (HEAD -> master) HEAD@{0}: reset: moving to 1bc39fe
7352e48 HEAD@{1}: reset: moving to HEAD^
1bc39fe (HEAD -> master) HEAD@{2}: commit: del -1
7352e48 HEAD@{3}: commit: add -1
07c6082 HEAD@{4}: commit (initial): git-test file commit
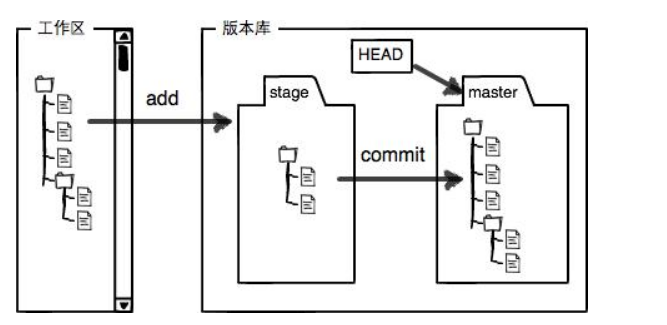
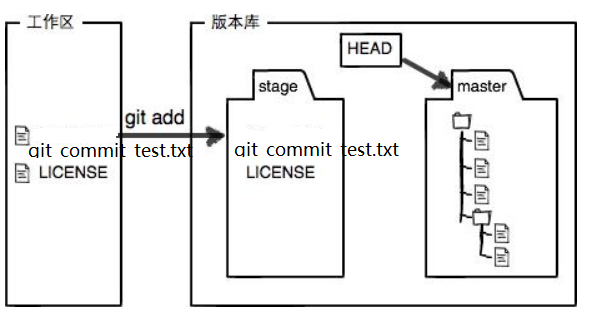
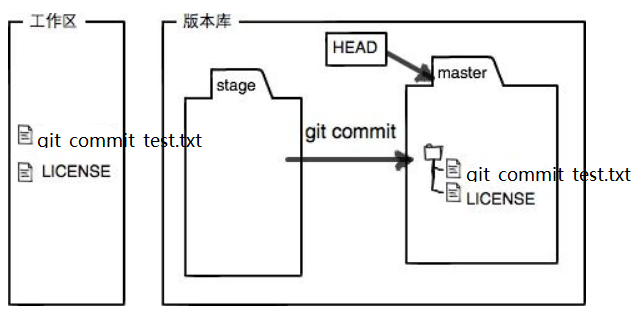
认识工作区和暂存区
MyGit文件夹就是一个工作区,不包括隐藏文件.git
.git隐藏文件为版本库,暂存区(stage)在其里面,
命令git add filename,实际上将工作区上要提交的所有文件修改保存到暂存区(stage)
命令git commit,实际上将暂存区上的所有文件修改提交到分支
example:
1
2
3
4
5
6
7
8
9
10
11
12
13
14$ git status
On branch master
Changes not staged for commit:
(use "git add <file>..." to update what will be committed)
(use "git checkout -- <file>..." to discard changes in working directory)
modified: git_commit_test.txt
Untracked files:
(use "git add <file>..." to include in what will be committed)
LICENSE
no changes added to commit (use "git add" and/or "git commit -a")1
$ git add git_commit_test.txt LICENSE
1
2
3
4$ git commit -m "add LICENSE"
[master e280461] add LICENSE
1 file changed, 0 insertions(+), 0 deletions(-)
create mode 100644 LICENSE1
2
3$ git status
On branch master
nothing to commit, working tree clean

管理修改
Git跟踪并管理的是修改并非是文件
输入命令-git diff(可以查看工作区和暂存区的区别)
1
$ git diff
输入命令-git diff HEAD – filename(可以查看工作区和分支的区别)
1
$ git diff HEAD -- filename
输入命令-git diff – cache(可以查看暂存区与分支的区别)
1
$ git diff -- cache
撤销修改
输入命令-git checkout – filename(将filename在工作区的修改全部撤销,适用于撤销工作区修改)
撤销工作区修改
1
$ git checkout -- filename
输入命令-git reset HEAD filename(暂存区的修改撤销掉,重新放回工作区,结合git checkout – filename适用于撤销工作区和暂存区的修改)
撤销暂存区修改
1
$ git reset HEAD filename
1
$ git checkout -- filename
输入命令-git reset –hard commit_id(版本回归,适用于撤销工作区和分支修改)
撤销分区修改(已提交修改)
1
$ git reset --hard commit_id
删除修改
输入命令-rm filename(删除工作区文件)
1
$ rm filename
输入命令-git rm filename 和 git commit -m”提示信息”(删除版本库文件,适用于删除工作区文件后想继续删除版本库对应文件)
1
$ git rm filename
1
$ git commit -m"del file : ..."
输入命令-git checkout – filename(撤销工作区修改,适用于删除工作区文件后想还原工作区文件)
1
$ git checkout -- filename
创建远程仓库连接
创建本地Git仓库与GitHub仓库之间的传输(SSH)
创建SSH Key。在用户主目录下,看看有没有.ssh目录,如果有,再看看这个目录下有没有id_rsa和id_rsa.pub这两个文件,如果已经有了,可直接跳到下一步。如果没有,打开Shell(Windows下打开Git Bash),创建SSH Key(id_rsa-私钥,id_rsa.pub-公钥):
1
$ ssh-keygen -t rsa -C "847686279@qq.com"
登录GitThub账号,Settings->SSH and GPG keys->New SSH key->填写title(name_sys_ssh_key),Copy id_rsa.pub内容 Paste 到 Key->Add key
PS :若干电脑的ssh的key都可以同一个GitHub上
添加远程仓库
GitHub上添加远程仓库
登录GitThub账号->Create a new repo->在Repository name填入repository name(对应本地仓库名,多为项目名)
本地打开Git Bash->切换到相应仓库目录->运行命令
1
$ cd Repository path
1
$ git remote add origin git@github.com:GitHubName/Repository.git
本地仓库推送远程仓库
切换到相应仓库目录
1
$ cd Repository path
推送至GitHub
首次推送
1
$ git push -u origin master
非首次推送
1
$ git push origin master
本地仓库拉取远程仓库
切换到相应目录
1
$ cd Repository path
拉取至本地
1
$ git clone git@github.com:GitHubName/Repository.git
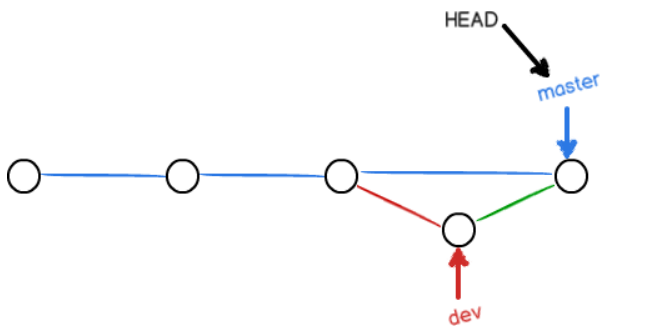
分支管理
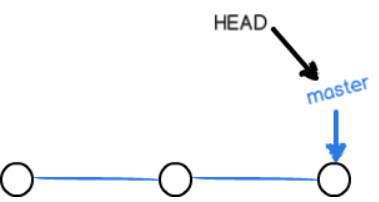
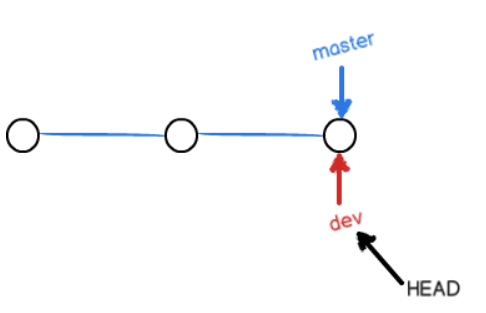
说明:主分支(master),每个结点为commit结点,master指针指向最近一次commit结点,HEAD指针指向当前分支master。每次commit形成一个结点并与之前结点用时间线连起来。
查看分支
1
$ git branch
创建分支
1
$ git branch BranchName
切换分支
1
$ git checkout BranchName
创建并切换分支
1
$ git checkout -b BranchName
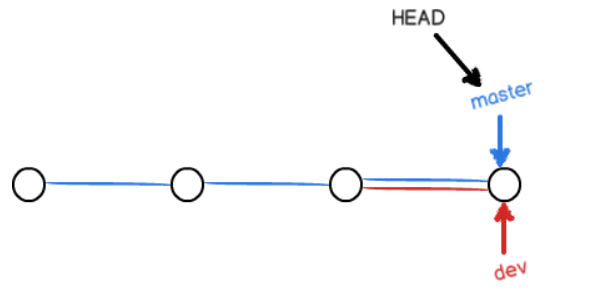
合并分支(合并目标分支到当前分支)
1
$ git merge TargetBranchName
删除分支
1
$ git branch -d BranchName

解决冲突
编辑冲突文件,删除冲突内容
1
Git用<<<<<<<,=======,>>>>>>>标记出不同分支的内容
添加并提交
1
$ git add filename
1
$ git commit -m"提交信息"
查看分支合并图判断是否解决冲突
1
$ git log --graph
1
$ git log --graph --pretty=oneline --abbrev-commit
分支管理
分支合并使用命令-git merge –no-ff -m “merge with no-ff” BranchName,强制禁用Fast forward模式,Git在merge时生成一个新的commit,从而分支历史上就可以看出分支信息
1
$ git merge --no-ff -m "merge with no-ff" BranchName
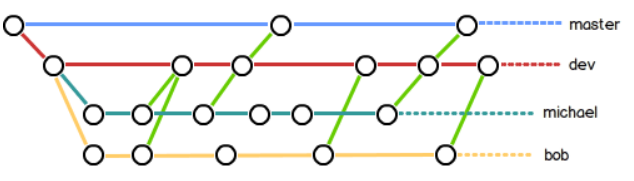
团队合作分支管理
matser:用于新版本的发布
dev:用于开发环境
user:用于个人开发环境
BUG分支
在个人开发分支上尚未提交的前提下,修改其他分支出现的BUG的时候,使用BUG分支
保存当前分支工作环境
1
$ git stash
切换修复分支,建立临时BUG分支,修复BUG,添加并提交,切换至修复分支,合并,删除临时BUG分支,切换返回个人开发分支
1
$ git checkout BranchName
1
$ git branch -b BUGBranchName
查看保存的工作环境
1
$ git stash list
恢复保存的工作空间
1
$ git stash apply stash@{0}
删除保存的工作空间
1
$ git stash drop stash{0}
Feature分支
在开发分支上若想增加特征或功能,则需创建临时特征分支,开发,添加并提交,切换至开发分支,合并分支后删除临时特征分支,若新特征或功能需要在未合并前撤销,则使用命令-git branch -D BranchName强制删除临时特征分支
1
$ git branch -D BranchName
多人协作
输入命令-git remote -v(查看远程库信息)
1
$ git remote -v
多人协作的工作模式
首先,可以试图用git push origin branch-name推送自己的修改
如果推送失败,则因为远程分支比你的本地更新,需要先用git pull试图合并
如果合并有冲突,则解决冲突,并在本地提交
没有冲突或者解决掉冲突后,再用git push origin branch-name推送就能成功
PS:
如果git pull提示“no tracking information”,则说明本地分支和远程分支的链接关系没有创建,用命令git branch –set-upstream branch-name origin/branch-name
创建远程origin的dev分支到本地,用命令git checkout -b branch-name origin/branch-name
标签管理
一个标签(tag)代表一个版本库,实质是指向某个commit的指针,可以创建与销毁,不可移动
创建标签:
输入命令-git tag < name >(默认指向最新commit)
1
$ git tag version1.0
输入命令-git tag < name > commit_id(指向指定commit)
1
$ git tag version1.0 eea97fe
输入命令-git tag -a < name > -m “descride…” commit_id(指向指定commit,含有文字说明)
1
$ git tag -a version1.0 -m "create a tag : version1.0" eea97fe
输入命令-git tag -s < name > -m “descride…” commit_id(指向指定commit,含有文字说明,用PGP签名标签)
1
$ git tag -s version1.0 -m "create a tag : version1.0" eea97fe
操作标签:
输入命令-git tag(查看所有标签)
1
$ git tag
输入命令-git show < name >(查看指定标签的具体信息)
1
$ git show version1.0
输入命令-git push origin < name >(推送一个本地标签)
1
$ git push origin version1.0
输入命令-git push origin –tags (推送全部未推送过的本地标签)
1
$ git push origin --tags
输入命令-git tag -d < name > (删除一个本地标签)
1
$ git tag -d version1.0
输入命令-git push origin :refs/tags/< name > (删除一个远程标签,在此操作前先删除本地标签)
1
$ git push origin :refs/tags/version1.0


